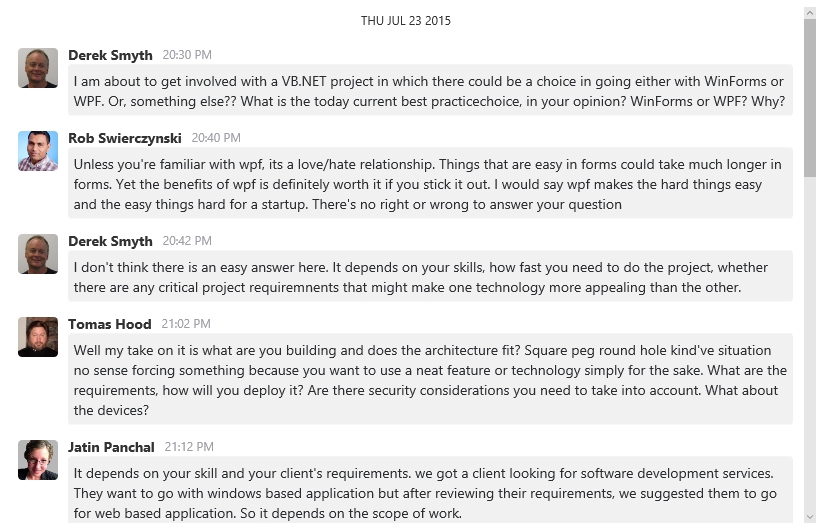
You can use Spread.Views to create an interactive chatting interface. Use the row template feature to arrange data from a table. Then create a chatting interface using the Grid Layout.
Use the following steps to create a threaded chat interface using Spread.Views, as shown in the following image.

- Add the following references to the project.
<link rel="stylesheet" type="text/css" href="[Your Stylesheet Path]/gc.spread.views.dataview.10.1.1.css">
<script src="[Your Script Path]/gc.spread.common.10.1.1.min.js" type="text/javascript"></script>
<script src="[Your Script Path]/gc.spread.views.dataview.10.1.1.min.js" type="text/javascript"></script>
<script src="[Your Script Path]/gc.spread.views.gridlayout.10.1.1.min.js" type="text/javascript"></script>
<script src="[Your Script Path]/gc.spread.views.timelinegrouping.10.1.1.min.js" type="text/javascript"></script>
<script src="[Your Script Path]/zepto.min.js" type="text/javascript"></script>
<script src="[Your Script Path]/license.js" type="text/javascript"></script>
<script src="data/conversation.js" type="text/javascript"></script>
Add a style tag within the head tag to apply styling to the interface.
* { -webkit-tap-highlight-color: rgba(0, 0, 0, 0); } .gc-grid { border: none; } .photo-container { width: 50px; display: inline-block; vertical-align: top; } .message-container { width: calc(100% - 50px); display: inline-block; vertical-align: top; } .employee-photo { width: 40px; height: 40px; border-radius: 4px; margin-left: 5px; margin-right: 5px; } .float-left { float: left; } .float-right { float: right; } .tml { margin: 8px; } .contentContainer { width: 100%; } .name { font-weight: bold; } .time { color: #9e9ea6; margin-left: 8px; } .contentContainer.float-right .chat-content { float: right; } .chat-content { display: inline-block; line-height: 17px; color: #333; font-weight: normal; font-size: 14px; background-color: #cfedfb; padding: 5px 10px; white-space: pre-line; word-wrap: break-word; border-radius: 3px; text-align: left; max-width: 100%; box-sizing: border-box; margin: 0; } .gc-cell-border { border: none; } .gc-cell { overflow: inherit; white-space: normal; padding: 0px; } .divider { padding: 0.4em 1em; color: #333; position: relative; text-align: center; text-transform: uppercase; font-size: 12px; } .gc-focused { border-radius: 5px; } .gc-focused .chat-content { background: initial; } .gc-group-header-row { background: initial; }- Add a div tag within the body tag to include the DOM element as the container in the page.
<div style="height: 100%; position: relative"> <div id="gridContainer" style="height:100%;"> <div id="grid1" style="height:100%;position: relative"></div> </div> <template id="rowtml"> {{? it.name === "David Archer" || it.name === "Tomas Hood"}} <div class="tml"> <div class="message-container"> <div data-column="time" class="time float-right" ></div> <div data-column="name" class="name float-right"></div> <div data-column="content" class = "contentContainer float-right" ></div> </div> <div class="photo-container"> <div data-column="photo"></div> </div> </div> {{??}} <div class="tml"> <div class="photo-container"> <div data-column="photo"></div> </div> <div class="message-container"> <div data-column="name" class="name float-left"></div> <div data-column="time" class="time float-left" ></div> <div data-column="content" class = "contentContainer float-left" ></div> </div> </div> {{?}} </template> </div> - Add a variable definition to instantiate the instance of Spread.Views. Then add the column definitions.
``` var headerTemplate = '{{=it.name}}';
```var peopleName = ['David Archer', 'Derek Smyth', 'Greg Boudreau', 'Israel Hernandez', 'Jatin Panchal', 'Prasanga Basnayake', 'Rob Swierczynski', 'Tomas Hood']; var timeFormatter = 'HH:mm tt'; var photoPresenter = '<img class="employee-photo" src="{{=it.photo}}"/>'; var contentPresenter = '<p class="chat-content">{{=it.content}}</p>'; var columns = [{ id: 'photo', dataField: 'photo', presenter: photoPresenter }, { id: 'name', dataField: 'name' }, { id: 'time', dataField: 'time', format: timeFormatter }, { id: 'content', dataField: 'content', presenter: contentPresenter }]; Add the rowTemplate definition followed by a function to call the stored data from the table.
     var items = [];
            $.each(data, function(key, val) {
                for (var prop in val) {
                    if (prop === 'time') {
                        val[prop] = new Date(val[prop]);
                    }

                    val.name = peopleName[Math.floor((Math.random() * 8))];
                    val.photo = './images/' + val.name + '.jpg';
                }
            });

            var dataView1 = new GC.Spread.Views.DataView(document.getElementById('grid1'), data, columns, new GC.Spread.Views.Plugins.GridLayout({
                grouping: [{
                        field: 'time',
                        header: {
                            visible: true,
                            template: headerTemplate,
                            height: 30
                        },
                        footer: {
                            visible: false
                        },
                        converter: function(time) {
                            return time.toDateString();
                        }
                    }

                ],
                autoRowHeight: true,
                showRowHeader: false,
                showColHeader: false,
                rowTemplate: '#rowtml',
                selectionMode: 'none'
            }));

            window.addEventListener('resize', function() {
                dataView1.invalidate();
            });

            //focus data.view by default
    document.querySelector('#grid1').focus();
